How To Make Cake Pops Easily? (Perfect Way)
by Joshua Speaks
It’s my niece’s 5th birthday when I made pop cakes for the first time. I wasn’t much skilled in making these fun treats and guess what? It was a total disaster! And of course, I was a broken heart after doing all those rolling, dipping and freezing. And all went in vain!
So I started going through a lot of recipe books and online tutorials. When I applied some tricks in my recipe, these pops turned out to be something whimsical!
Read our Cake Pop Maker buying guide.
So here are the facts those will make your cake pops not just easy but also fun.
Contents
Things you require:
- Cake making ingredients
- Large Bowls
- Cake Pan
- Ice-cream Scoop
- Serving spoon
- Aluminum foil
- Vanilla frosting
- Parchment paper
- Cookie sheet
- Bowls for microwave
- Skewer
- Lollipop stick
- Candy melts and color
How to make cake pops
Let’s divide the whole process into three major segments. It’ll make things easier for you to remember and proceed accordingly. These segments are- baking, rolling and dipping.
Segment 1: baking the cake
Step 1: Prepare the pancake
First, Take a 9 x 13 pan for making the cake. You can also spray some bake-spray on the cake pan so that your cake doesn’t stick to it.
Step 2: Pick a recipe
It’s all up to you which flavor you want to choose. It may be vanilla or chocolate. But the sour cream of white almond is my personal favorite. Also, add other necessary ingredients. My recipe requires 7-8 cups of batter.
Step 3: Bake it
Now put it in the microwave at a certain temperature. Wait until it’s completely baked.
Step 4: Cool down the cake pan
Bring the pan out of the oven when the baking is done. Then let it cool down. Then cut the cake into 4 equal square parts by using a knife. My recipe yields 12 pops from each of the quarter. So total 48 cake pops are produced from one pan. Confused of Muffin Pan or Cupcake Pan? Read this article.
But the number of cake pops that each cake pan yields can differ depending on the type of batter you use. So regarding the quality of batter, this number can be 15 pops for each quarter or 60 for the whole pan.
Remove the cake, quarter or the entire one, as you require, from the pan and finish cooling.
Tip: don’t forget to note down the quantity of your recipe when you’re making cake pops the first time. It’ll help you modifying and correcting the recipe in future.
Segment 2: rolling the pop balls
Step 1: Cut the outer edge
The outer edge of the cake is responsible for creating hard lumps inside the cake pops. So remove them first.
Step 2: Crumble
I usually cut one piece into four small pieces. Then take two pieces of cakes in your palms. Now rub the pieces together to make fine crumbs and collect them in a bowl. You can also use forks to crumble them.
Step 2: Frosting
You can either use homemade icing or buy canned icing. As a first timer, I recommend you to use canned icing. As this is very moist, so use less than 1/4th of the can of frosting. This amount can vary regarding the moisture of your recipe.
Spread the frosting on the crumbs evenly and then mix it. You can use the back of a teaspoon to smash the crumbs. Mix it so that the crumbs and the icing together become pulpier.
Note: It’s super important not to make it moister than what it requires only to roll them into balls. Adding too much frosting can create unpleasant texture. Using hand for mixing them is always better.
Step 3: Make round balls
Use small scoop so that the round shape of cake pops remains consistent. A ¾ tablespoon size of scoop will work perfectly.
Now scoop enough mixture to make a round cake pop. Again, use your hand palm to create ball shapes out of the mixture. Keep rolling the balls applying a firm pressure until you’re satisfied with their shapes.
Tips: while making small balls with your hand, frequently moisten the palms with water. Wet palms will give smooth exterior surfaces on the balls and also give them uniform shapes.
Step 4: Refrigerate the balls
Now place the balls on a cookie sheet and cover them with a plastic foil. Then place them in the refrigerator for not less than 4 hours. If the ball doesn’t fall off the sticks easily, that means they aren’t firm enough. In that case, keep them in the refrigerator overnight which will do the rest firming up.
Segment 3: dipping the balls
Step 1: Prepare the candy melts
Take the candy melts into a bowl. The bowl must be of a shape that you can dip the stick straight down so that the whole pop covers with chocolate. Or you can use a deep narrow cup.
What type of chocolate you choose also matters a lot. Choose one that will make sure that your cake pop won’t fall off while dipping.
You can add some candy color in the melted chocolate if you want.
Step 2: Dip the lollipop stick
Dip one end of the stick up to one inch. Now push the middle of the cake ball into the chocolate-dipped side of the stick.
Step 3: Dip the cake pop
Now dip the cake pop into the melted chocolate so that the chocolate covers the entire body of the ball. It’s wise to dip it straight up to the joint of the ball and the stick.
Now hold the stick sideways over the chocolate bowl. Then slowly rotate it so that the excess chocolate drips off.
When you think it’s enough dripping, turn the pop upside. Hold it like this for a few moments and allow it to dry. Now clear off excess chocolate from the body of the pop with your finger for a smooth look.
By using a skewer, drill holes in a foam holder and place the sticks into the foam block. Keep them there for drying.
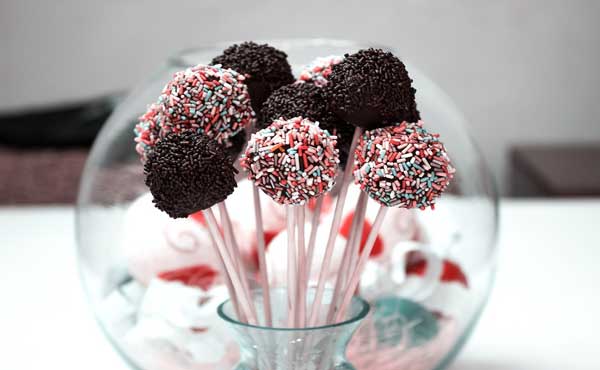
Congratulation, you’re done making cake pops!
Note: Don’t forget to watch the video from below:
Final verdict
Though my first experience doesn’t tell it, what I found later is that cake pops are amazing. Preparing it doesn’t even require any cutting or serving. It’s no mess and the best part is that NO leftovers. Once you get the tricks, it’s no trouble to prepare cake pops for a birthday party or shower like programs.
Wish you a happy caking!

About Joshua Speaks
Can’t think of a day that that Josh didn’t have a beer or two. Be it a long day of work or of nothing. Sometimes, it is a few packs even. Especially when there are familiars over.
His fridge is packed with beers: Heineken, Corona, Guinness, Budweiser, and all other wierd brands in between. He had to get a secondary 30 cu. fridge off Craigslist for more beer storage.
Sometimes he wonders if a day truly starts only after the first sip of beer for the day. Enough talk about Josh and his passion; that’s the reason for this beer blog and related items. Feel free to hit on him. Start with something like: “hey beer head!” You got the idea!
Thoughts on "How To Make Cake Pops Easily? (Perfect Way)"
 |
 |
 |
 |
Kitchen - Outdoor