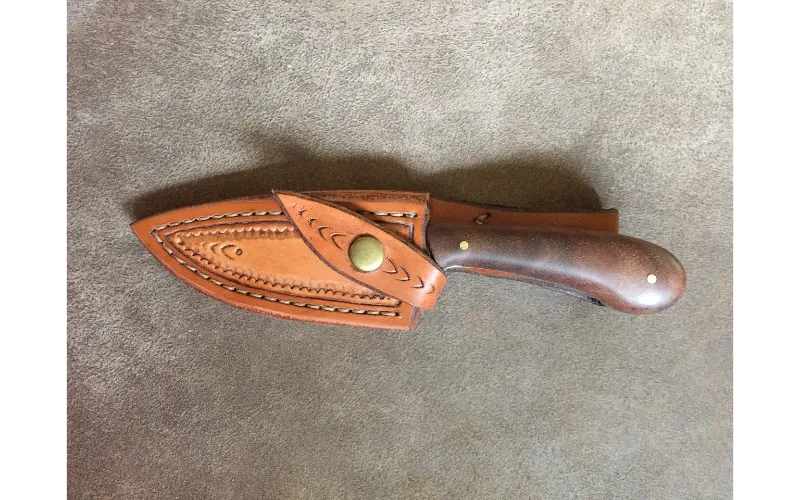
How to Make a Leather Sheath
by Joshua Speaks
For an outdoor excursion, there are many tools that one wants to keep at an accessible place.
To name a few, pocket watch, compass, cell phone, and a tool that you are carrying along say a knife or whatever.
The purpose can be easily served by using a sheath. As you know genuine leather sheaths are quite expensive,
so here I have compiled a step -by step guide on How to Make a Leather sheath using genuine leather that can be molded easily while wet to give a snug fit.
Material Required:
1. A piece of Leather (5 to 6 ounces)
2. Cling Film wrap or any plastic
3. Paper clips/ spring clips
4. Rotatory Cutter
5. Fid or any pointed tool
6. Rowel Tool
7. Leather needle and a nylon thread/ Waxed Tendon
8. Groove tool
9. Pan with tap water.
10. Tape
11. Marker
12. Cardboard
13. Scissor
How to Make a Leather Sheath for a Knife
How to make a leather knife sheath, is an easy 8 steps process that is thoroughly elaborated below. If you want to know the difference between Scabbard Vs Sheath before you are going to make it manufactured.
Step 1: Sketching the pattern:
At first, take plain paper/cardboard and draw quadrates over it. Now place the knife for which you are going to make a sheath on the y axis and trace the shape of the knife accordingly.
This pattern will give you an idea about the overall size of the leather you need to prepare the knife. Repeat the process and draw the mirror image of the same in the 2nd and 4th quadrant. Now you can access the size of the leather piece required to get the job done.
Step 2: Cut and Assemble the sketched pattern:
Join the two mirror images sketched on the board to form a complete layout that needs cutting. Now, take a scissor and start cutting along the pattern sketched leaving 2-2.5cm space.
This space will be used to sew the leather and folding it inside. You have your layout in your hand now. Place the knife on your layout and softly fold the cardboard to make a crease and form a 3-dimensional pouch outlook. It will show the actual shape and appearance of your sheath.
Don't forget to place the knife and make sure that the sheath pouch size is a perfect fit for your blade. If you feel difficulty in checking the pouch size, use tape to secure the folded ends which you can remove later to get a flat pattern layout.
Step 3: Cutting Leather
Here you need a piece of leather by which you want your sheath to be made. Place your pattern at the backside of the leather, ignore the belt area and draw the design as sketched.
Be a bit generous and take care not to go even a cm smaller than the stencil size. Now use the scale and draw a smooth line to design a belt holder. The size of this rectangular area depends upon the design you have selected for your sheath.
Step 4: Form a Leather in shape:
Safety first applies that wrap your blade precisely with plastic, it can be any, or you can go with the cling film wrap. Wrap it over and over and secure it with the tape to avoid any slip-off.
Place your piece of leather in water to soak well. You will see the bubbles coming out of leather as leather is soaking water inside. This will let the leather expand and be easy to work on.
Now take a wet leather stencil and place your knife inside the pattern. As we have 2-3 cm extra space in the pocket fold the leather along sides facing the inward movement.
This will give you a complete 3D pouch with a knife inside. Take paper clips and secure the folded corners of the leather thoroughly. Let the leather dry naturally for several hours, it is good if you leave it to get dry overnight.
No, but make sure to check the pattern after every 5 min, in the beginning, to check the folded ends are bent and secured properly in the way you want them to be. As the leather gets dry it will squeeze and the perfect fit will come up consequently.
Step 5: Trimming and Preparing the Sheath for Stitch:
As your 3D pouch is ready now, take a rotatory cutter and trim the leather sides. Be gentle while using the rotatory blade as your leather is water dry hard it might require more hard work.
You can trim and smooth the edges using sandpaper also. Now you need and prepare to Stitch the Seam
Using the rotary cutter, trim the sheath to size by taking off the rough edges and following the contour of the blade and handle. You're cutting through two layers of leather that have been water-hardened so it'll take a little more pressure.
Go slow and don't cut yourself. Use leather gouge and draw a shallow groove across the sheath. Following the grooves drawn use a rowel tool to get punches and fid or any pointed object to make holes. It is preferable to make 6 holes in a one-inch area.
Repeat the process at the other side and make holes by placing the sheath upside down. Be careful about the alignment of the holes otherwise, your sewing will be a whole mess and laborious.
Step 6: Stitching the Loop for Belt:
Before stitching your sheath, stitch the loop for the belt in place. It will make the process easier. Flap the rectangular leather extension over one side and secure it in place while sewing it. Use leather punch, fin, or any pointed tool to make a hole and sew at least 3 stitches using nylon thread and needle.
Step 7: Sewing the Seam
Here you need a needle (leather sewing long and thick needle), a nylon thread, or a tendon of your choice and color. Move across the marked holes upside down, either by double stitch technique or a chain stitch technique. Start from the bottom to up and reach the tip of the blade where you need to tie a knot.
Make sure to tightly secure every stitch by knots so that no loosen thread is left behind, for the same reason one thread technique is preferred here. Now press all the stitches using the wooden side of the fin or any wooden block. This will give a very tidy appearance in all.
Step 8: Place your Knife Inside:
Now your sheath is ready for use. Place your blade inside, at first, it will feel quite fit but as the leather loosens up a bit over time, the pouch capacity will also get adjusted accordingly.
Conclusion:
To conclude, learning how to make a leather sheath is a kind of DIY project and can be easily mastered by practicing the above-mentioned steps once or twice. Hope the above-listed steps will answer all your queries on How to make a leather sheath.

About Joshua Speaks
Can’t think of a day that that Josh didn’t have a beer or two. Be it a long day of work or of nothing. Sometimes, it is a few packs even. Especially when there are familiars over.
His fridge is packed with beers: Heineken, Corona, Guinness, Budweiser, and all other wierd brands in between. He had to get a secondary 30 cu. fridge off Craigslist for more beer storage.
Sometimes he wonders if a day truly starts only after the first sip of beer for the day. Enough talk about Josh and his passion; that’s the reason for this beer blog and related items. Feel free to hit on him. Start with something like: “hey beer head!” You got the idea!
Thoughts on "How to Make a Leather Sheath"
 |
 |
 |
 |
Kitchen - Outdoor