Easy Gingerbread Snowmen Cookies
by Joshua Speaks
Happy Saturday everyone!
If you've been following me for a while then you know that my job during the day is working in a classroom with 9 of the most amazing children. They're all so different and have taught me some sort of lesson about myself or life in general. I truly enjoy being with them each day.
Contents

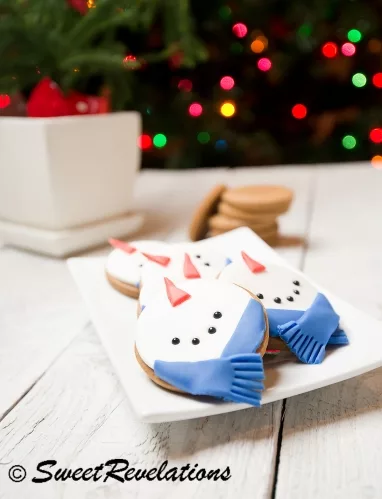
The past few weeks in our room have been all about the holiday season and the magic of winter. We recently did a snowman art project and I thought it was so cute that I copied it in cookie form for them. They were pretty impressed and I was too~ it was incredibly easy! How cute are these snowmen cookies who are gazing up at the snowflakes falling from the sky? Pretty whimsical and a great gift idea or classroom party snack.
Did you know that you can place a fondant decoration on top of hot cookies right out of the oven and they will mold perfectly on top? Nothing else required! The longest part of the cookie prep is making the fondant decorations for the top. After that, things move pretty smoothly.
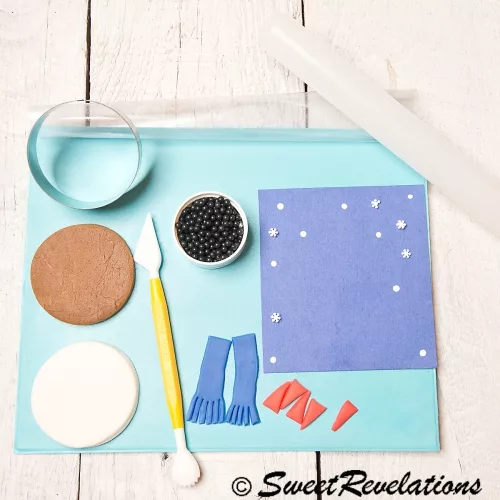
First off, here are the items you need:
- Gingerbread recipe (see below)
- Round cookie cutter
- White, blue and orange fondant
- Fondant roller
- Black sugar pearls - I used 4 mm
- Card stock with snowflakes painted on (if you're giving the cookies as gifts)- I used white food colour gel and the back of a paintbrush
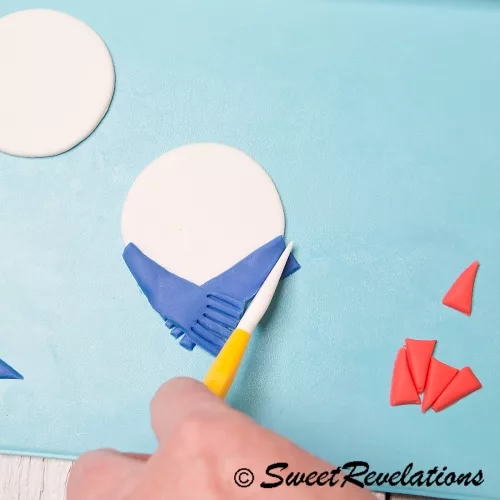
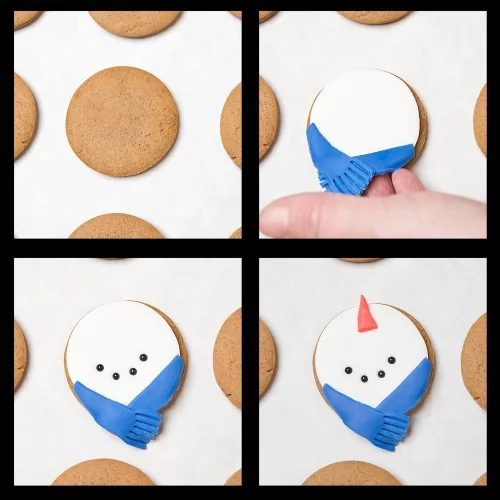
Start by rolling out your cookie dough and using the cookie cutter to cut out all of your cookies. Place them on trays in the fridge until you're ready to bake. Use the fondant roller to roll out the white fondant (a bit of Crisco on the counter top stops it from sticking). Use the same cookie cutter to cut out as many white circles as you have cookies. Place them under some Saran or a fondant mat to keep the fondant from drying out (single file). Meanwhile, start the scarves. Roll out the blue fondant and cut two strips for the scarf, using a knife to cut the end tassels. Put a little bit of water on your finger and rub it on the bottom side of the scarf to help it adhere to the white fondant (very little water is needed). Place the scarf on the white circle as shown in the picture below. Cut the corners to keep the snowman round.
Roll out the orange fondant and cut out some carrot noses with a knife. Keep all fondant under the Saran to keep it from drying out. Now you can start baking and assembling! As soon as the cookies come out of the oven start placing the snowmen on top. Once you've covered the whole tray of hot cookies with the fondant rounds, you can start pressing in the black pearls for the mouth. Carrot noses will stick on with just a smidge of water.
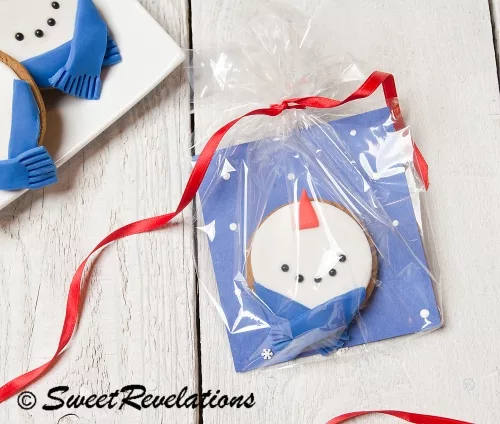
Tah dah!! Looks great right? For packaging I simply placed a cookie on a piece of blue cardstock with some little white dots (I had some snowflake sprinkles to add too) and then in a cellophane wrap. I must tell you that the cookies were a big hit although they need to be handled with care as the noses can be fragile. When I do them again I will move the noses down just a hair so that they aren't sticking out as much.
And that's it. A fun baking project that you can do with your own children or just to give to the very special children in your life!
Now go forth and create my little snowflakes! Use your imagination and have fun!
Renee
Gingerbread Cookies
*Martha Stewart
- 3 cups all-purpose flour, plus more for work surface
- 1/2 teaspoon baking soda
- 1/4 teaspoon baking powder
- 1/2 cup unsalted butter, room temperature
- 1/2 cup packed dark-brown sugar
- 2 teaspoons ground ginger
- 2 teaspoons ground cinnamon
- 3/4 teaspoon ground cloves
- 1 /2 teaspoon finely ground pepper
- 3/4 teaspoons kosher salt
- 1 large egg
- 1/2 cup molasses
- Sift together flour, baking soda, and baking powder into a large bowl. Set aside.
- Put butter and brown sugar in the bowl of an electric mixer fitted with the paddle attachment and mix on medium speed until pale and fluffy. Mix in spices, salt, eggs and molasses. Add flour mixture and mix on low until just combined. Divide dough in half and wrap each in plastic. Refrigerate until cold, about 1 hour.
- Preheat oven to 350 degrees. Roll out dough on a lightly floured work surface to a 1/4-inch thick. Cut into circles with a 2.5″ cookie cutter. Space 2 inches apart on baking sheets lined with parchment paper, and refrigerate until firm or ready to use.
- Bake cookies until crisp but not dark, about 8 minutes. Cover immediately with fondant tops.

About Joshua Speaks
Can’t think of a day that that Josh didn’t have a beer or two. Be it a long day of work or of nothing. Sometimes, it is a few packs even. Especially when there are familiars over.
His fridge is packed with beers: Heineken, Corona, Guinness, Budweiser, and all other wierd brands in between. He had to get a secondary 30 cu. fridge off Craigslist for more beer storage.
Sometimes he wonders if a day truly starts only after the first sip of beer for the day. Enough talk about Josh and his passion; that’s the reason for this beer blog and related items. Feel free to hit on him. Start with something like: “hey beer head!” You got the idea!
Thoughts on "Easy Gingerbread Snowmen Cookies"
 |
 |
 |
 |
Kitchen - Outdoor